logo logo
  • Mới
  • Tài liệu
      • Công cụ
      • Driver
      • Email Yandex
      • Kinh Nghiệm
      • LightSail
      • Mã nguồn
        • Blogspot
          • Chuyên gia Blogspot
        • Odoo
        • WHMCS
        • WooCommerce
        • WordPress
          • Advanced custom fields
          • Elementor
          • Zubi Cloud Builder
        • Xenforo
      • Phần mềm
      • Plugin
      • Quản trị Server
        • CWP – CentOS Web Panel
        • CyberPanel
        • Digital ocean
        • HocVPS Script
        • Vultr
      • SEO
      • Support Admin
      • Tài liệu
        • Quy định – chính sách
        • Zubi Cloud Store
      • Tên miền
      • UltimatePOS
      • Windows
      • Zubi Cloud ID
        • Quản lý Hosting
        • Quản lý tên miền
      • Zubi ERP
  • Tài nguyên
    • Zubi ID
    • Zubi Store
    • Zubi Marketplace
  • Support
    • Liên hệ
    • Support 24/7
    • Quy định - chính sách
  • Bí kít nghề
Dịch vụ

Tài liệu hỗ trợ khách hàng Zubi Cloud

    Popular:
  • thiết kế wordpress
  • Shopee

"Lời hứa từ Zubi Group, dịch vụ và sản phẩm của chúng tôi là trọn đời, trường cửu."

  • Trang chủ
  • WHMCS
  • Cài đặt đăng nhập bằng Gmail trong WHMCS
25/07/2021 - 163 views

Cài đặt đăng nhập bằng Gmail trong WHMCS

5/5 - (1 bình chọn)

Zubi Cloud help hướng dẫn cách Cài đặt đăng nhập bằng Gmail trong WHMCS
Enabling the Google Sign In Integration enables visitors and customers to register, sign in and connect their Google accounts with your WHMCS installation for faster sign-up and automatic sign-in.
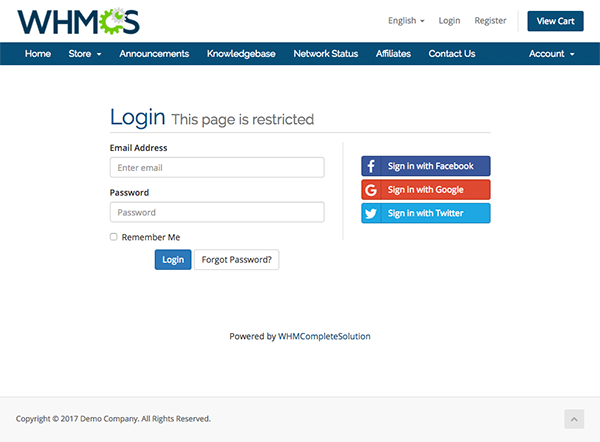
Signinintegrationslogin.png

Table of Contents

  • Configuring Sign-In with Google
    • Create a Google Developer Project and Retrieve API Credentials
    • Activate Google Sign In within WHMCS

Configuring Sign-In with Google

Watch the video tutorial for this feature cai dat dang nhap bang gmail trong whmcs 1133 1 

There are 2 steps required to setup Sign-In with Google:

  1. Create a Google Developer Project and Retrieve API Credentials
  2. Activate Google Sign In within WHMCS

Create a Google Developer Project and Retrieve API Credentials

Google Sign In Integration requires a Google Developer Project and API Credential Set. You can create this using your existing Google account. Users will only see the App Name you define and not see anything relating to the account you use to create the project.

Be aware that the Google account under which you create the app can not be changed without requiring users to re-authenticate and re-link their accounts so it is important to set the app up under an account that you will always have access to.

1. Visit https://console.developers.google.com/
2. If not logged in, login to your Google account
3. Under the Project selector, choose Create project

Googlesignin1.png

4. Enter a Project Name and click Create (This name is private to you)
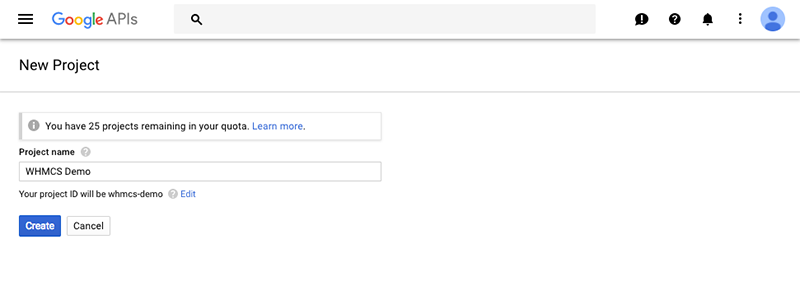
Googlesignin2.png

5. Next you will be taken to the project dashboard. From here, select Credentials in the left sidebar.

Googlesignin3.png

6. Before creating credentials, you must complete the OAuth consent screen configuration. Select this tab and enter a product name, homepage url and logo url (the name and logo you define here will be what users see when being asked to authorize access). Once complete, hit Save.
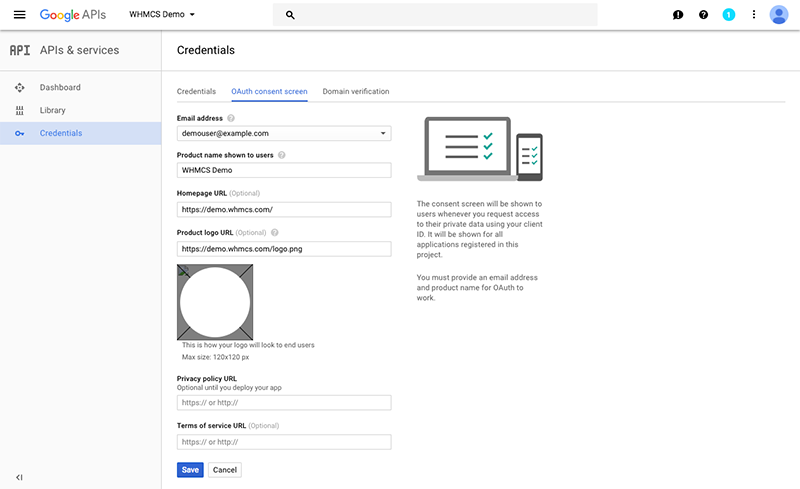
Googlesignin4.png

7. If not returned automatically, now return to the Credentials tab and select Create credentials > OAuth client ID.
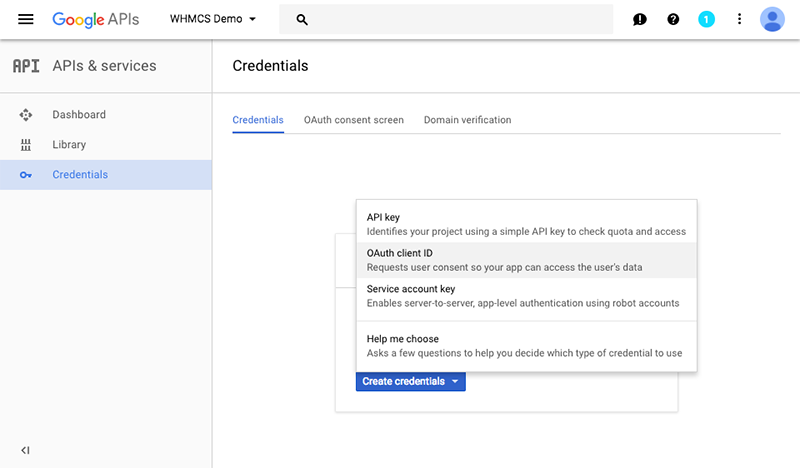
Googlesignin5.png

8. On the following screen, choose Web application
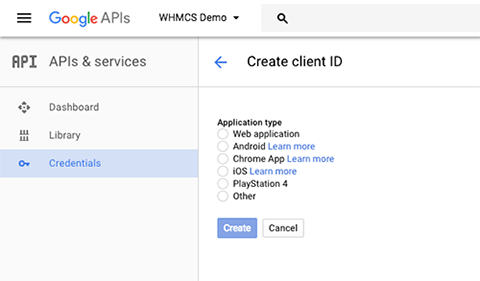
Googlesignin6.png

9. Next you will be asked to provide a name for the credential set (this is not visible to the public) and the authorized JavaScript origins and redirect URIs. Enter your full root domain in both the authorized JavaScript origin and redirect URI boxes. In the example here we are using “https://demo.whmcs.com“. Then hit Create.
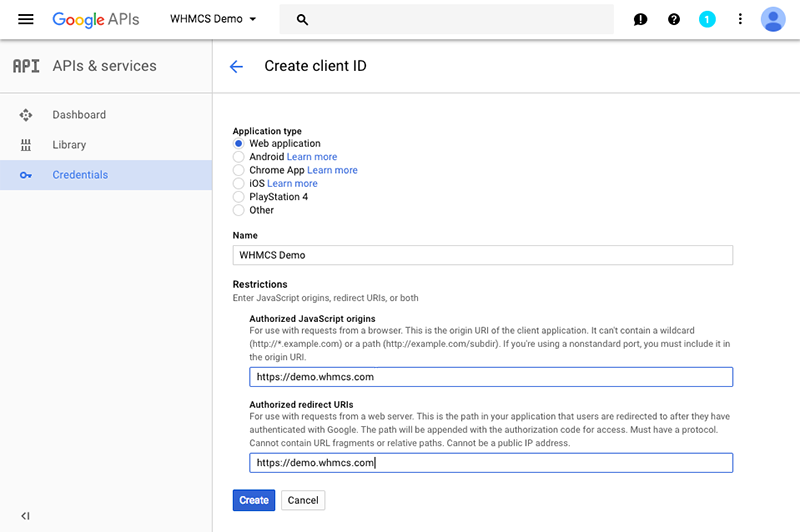
Googlesignin7.png

10. Your Client ID and secret will then be displayed. These are the values you will need to activate Google Sign In within WHMCS so store these in a safe place.
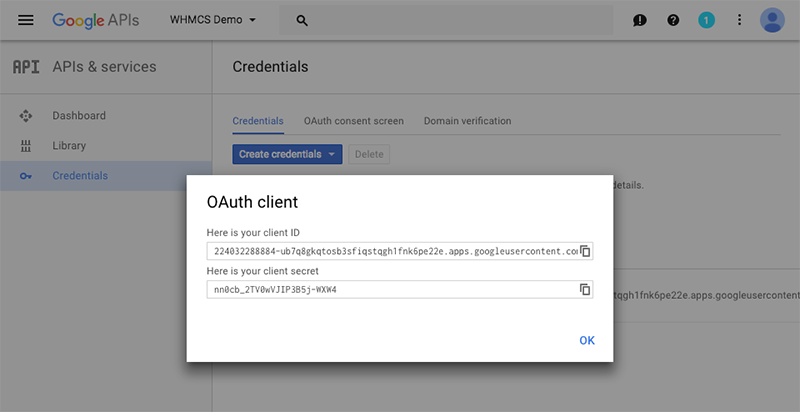
Googlesignin8.png

You can now proceed to Activate Google Sign In within WHMCS.

Activate Google Sign In within WHMCS

  1. Login to the WHMCS Admin Area
  2. Navigate to Configuration () > System Settings > Sign-In Integrations or, prior to WHMCS 8.0, Setup > Sign-In Integrations.
  3. Select Activate under the Google heading
  4. Enter your Google Client ID and secret where requested
  5. Click Save & Activate

WHMCS will attempt to validate and test the details you have entered. If the Client ID and secret are valid and successfully authenticate with the Google API, the values will be saved and the modal will close.

5/5 - (1 bình chọn)

Tags: Configuring Sign-In using Google, Google Sign whmcs


Bài liên quan
  • Hướng dẫn Update bản cũ lên WHMCS 8
  • Cách Crack bản quyền WHMCS 8.2 Nulled hoạt động tốt
  • Cách chuyển Domain ở nhà cung cấp tới WHMCS để quản lý
  • Cài đặt đăng nhập facebook trên WHMCS
  • Xóa trường Mật khẩu Gốc và NS1 khi đặt hàng trên WHMCS
  • Công cụ (6)
  • Driver (2)
  • Kinh Nghiệm (1)
  • LightSail (2)
  • Mã nguồn (137)
    • Blogspot (25)
      • Chuyên gia Blogspot (1)
    • Odoo (1)
    • WHMCS (11)
    • WooCommerce (25)
    • WordPress (79)
      • Advanced custom fields (2)
      • Elementor (2)
      • Zubi Cloud Builder (1)
    • Xenforo (4)
  • Phần mềm (2)
  • Plugin (1)
  • Quản trị Server (49)
    • CWP – CentOS Web Panel (5)
    • CyberPanel (23)
    • Digital ocean (1)
    • HocVPS Script (13)
    • Vultr (1)
  • SEO (3)
  • Support Admin (9)
  • Tài liệu (6)
    • Quy định – chính sách (4)
    • Zubi Cloud Store (1)
  • Tên miền (3)
  • UltimatePOS (3)
  • Windows (1)
  • Zubi Cloud ID (5)
    • Quản lý Hosting (4)
    • Quản lý tên miền (1)
  • Zubi ERP (3)
Bài xem nhiều
    • 1 số thư viện cần thiết khi thiết kế template Blogspot chuyên nghiệp

      post 26/08/2020 - 11188 views
    • Cách tạo Favicon biểu tượng trang web cho Blogspot

      post 08/10/2021 - 2832 views
    • Cách sửa lỗi không hiển thị Tawk.to trên Blogspot

      post 20/08/2020 - 2440 views
    • Thay chữ Sale giảm giá bằng % trong woocommerce WordPress

      post 11/08/2019 - 1056 views
    • Code lấy ảnh đầu tiên trong bài viết làm ảnh đại diện Auto Post Thumbnail

      post 11/08/2019 - 752 views

    Các kênh hỗ trợ

    Chúng tôi luôn ở đây 24/7 hỗ trợ bạn, đi cùng bạn trên chặng đường kinh doanh và phát triển doanh nghiệp

  • Kỹ thuật Support

  • Chát trực tuyến 24/7

  • Gửi email

  • Ultraviewer/Teamviewer

1 sản phẩm của Zubi Group
  • Liên hệ
  • Support 24/7
  • Theme Store
  • App Store
  • Quản lý dịch vụ